
Revised: 10/23/2008
|
|
|
Deflasking Revised: 10/23/2008 |
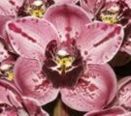
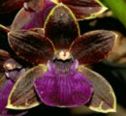
We have developed a method to remove cymbidium, zygopetalum or other orchid seedlings from flask with a minimum of mortality. With this method, we rarely lose a plant to damping off, and we believe it can be adapted for the home grower with good success. Links to photos of many of the steps are included
We normally use wide mouth quart canning jars for replating cymbidiums and wide mouth pint canning jars for zygopetalums. The wide mouth of the jars allows us to remove the plants with the root mass and the agar pretty much intact so there is no plant or root damage. Plants in Erlenmeyer flasks are difficult to remove without damage unless the flask is broken. In general, the larger plants should have reached the top of the bottle before you should consider deflasking. Smaller plants can be deflasked, but are more tender and generally grow a little slower and have a higher mortality rate. I prefer larger plants as they are easier to work with.
The first step we recommend is to take the lid off the jar or the stopper off the flask about 3 days before you plan to deflask the plants. This "hardening off" period seems to toughen the plants up before removal and seems to reduce damage during deflasking. After the "hardening off" period, with one hand, tap the jar against your other hand to loosen the agar and root mass from the walls of the jar, and with the jar pointing down a bit grab the larger plants and pull to separate the agar from the bottom of the jar. Gently tease the mass of plants, roots and agar from the bottle. If it wants to come out in chunks, that is fine.
For plants in Erlenmeyer flasks, we recommend breaking the flask to remove the plants. Place the flask in a heavy paper bag and close the bag around the neck. Hold the neck of the flask and tap the side with a hammer or mallet to break the flask. Gently remove the plants and whatever agar is clinging to the roots. Be careful to remove any glass shards that may be embedded in the plants or agar.
Once the plants are removed from the bottle, we then rinse the agar from the root mass using a standard kitchen faucet spray attachment and warm water (comfortable to the touch). It may help to gently move the roots with your fingers to loosen the agar as you are rinsing. Remove as much of the agar as possible. Most plant roots will separate easily once the agar is removed. Some plants, particularly paphiopedilums, have roots which form a great deal of root hair in the media. As a result, the roots may grow together so badly it is difficult to separate the roots without breaking many of them. Some cymbidiums seem to have a similar tendency, particularly hybrids from Cym. Solana Beach. In extreme cases, it may be necessary to keep the plants in clumps to avoid excessive damage.
After the agar has been removed from the roots, we then soak the plants in a solution of Subdue (a systemic fungicide) for about 5 minutes. The plants are then removed from the Subdue solution and thoroughly rinsed to remove any Subdue on the plants so they may be safely handled without gloves when potting. The Subdue concentration is 5 drops to a half gallon of water. Wear rubber gloves while working with the Subdue solution to avoid skin contact. Nitrile rubber gloves are preferred since they are more chemical resistant. The small plants are more susceptible to fungal diseases just out of flask, and the Subdue soak reduces the susceptibility to fungal diseases.
We cull or rogue plants from flask very heavily. Only strong, large plants are kept, and any small or deformed plant is discarded. We grade the seedlings by size before putting them in flats or pots. My general rule of thumb is that any cymbidium that is not at least 3 inches tall coming from flask is too slow a grower to be commercially worthwhile, although I will keep smaller plants to fill out any unused space in a flat. Very large plants are placed directly in 3" pots while the smaller plants are placed in flats. The smaller plants can also be placed in community pots if desired. We pot the seedlings in 10" x 20" nursery half flats with the plants spaced about an inch apart in a grid (square) pattern. This usually gives us about 120 to 130 plants to a flat. Smaller plants may be placed closer together and larger plants given more space as required.
We use straight seedling grade orchid bark, with dolomite lime and 20% perlite added, for the seedling flats, with no pretreatment of any sort. It is better for the bark to be damp when used so the small plants will dehydrate less until watered. I prefer to fill the flat with mix first, then use an old table knife to work the seedling roots into the mix by moving the knife next to the plant and displacing the mix until the plant is at the proper depth. I find this faster than placing a row of plants in the flat, then adding mix and more plants and mix until the flat is filled. Plants with very large root systems are easier to put in place in the flat and then add mix, however, and I find this method also works better when planting 3" or 4" community pots.
We started experimenting with another type of media for the seedlings from flask in 1998 and 1999, and in 2000, we are planting all of the seedlings from flask in plug trays with straight coir as the medium. Coir is the pith from the coconut husk which is removed from the coconut fiber used to make door mats and other fiber products. This material is similar to fine peat moss in texture, but is very resistant to breaking down, is very easy to re-wet when dry and holds a good amount of water and also contains 30% air when saturated. We found the seedlings grown in coir, either in plug trays or in our regular half flats, grew significantly faster than those under the same conditions in bark and the plants were considerably larger when removed from flat and put into 3 or 4 inch pots. The mortality rate was the same.
Planting the seedlings in plug trays similar to planting in bark as described above. We fill the cells of the tray with moist coir and using a table knife, make a hole in each cell and insert the seedling and gently press the coir around the roots, adding additional coir as needed to fill the cell. We do not fill extra cells, but leave them open which provides a division between crosses in the same tray. The cell spacing in filled trays provide good spacing between plants. For most cymbidiums, we use a 98 cell tray (7 cells across and 14 cells long), although we put large plants in a 72 cell tray and we use a 128 cell tray for smaller seedlings.
The small plants in coir suffer little shock, probably due to the high water retention ability, and start to grow rapidly. We see a very noticeable growth in a month as shown in this side-by-side example. After 4 months in plug trays, the seedlings have good top growth and root development, and some are large enough to be transplanted into individual pots if we choose. Zygopetalum seedlings also respond very well in the plug trays with the large plants in 98 cell trays and the small plants in 128 cell trays. These plants have been potted about 2 months, and the larger plants are up to 6 inches tall. After 4 months in plug trays, the zygo seedlings have good top growth and root development.
After potting, the flats are watered with a dilute solution of Physan or Naccosan (a mild bactericide, fungicide, algicide), 1/4 cup (2 oz) to 5 gallons of water to make a concentrate and then applied through a 1:16 hose end fertilizer injector. The small cymbidium plants are placed in an unheated greenhouse where high humidity is maintained and the temperature is not allowed to exceed 75 degrees for several weeks. The light intensity is about 800 - 1000 foot candles. They are watered whenever the top of the bark is dry with the Physan solution for the first 4 days and with plain water after that. This may be every day for the first week or so if the bark was dry when the plants were potted. After the first month, watering is cut back so that the plants do not dry out at the roots although the top may be dry. Also, after the first 4 days, the Physan solution is no longer used for every watering, but just every other month or so.
With this technique, we find that the problem of small plants damping off is almost nonexistent. We have almost no problem with fungal or bacterial diseases in the small seedlings with very low mortality. Most cymbidiums and zygopetalums do well for us, and we discard any plant that doesn't grow well for us under these conditions.
The amateur grower with just a flask or a few flasks can adapt this technique as well for almost any type of orchid to be grown from flask. The key to plant survival from flask is to keep the plants moist with humid conditions and never let them dry out until the root system is established, and to prevent fungal or bacterial diseases. The plants from a single flask will fit well in a small plastic shoebox with a transparent lid and a perforated bottom for drainage. With the plants first out of flask, keep the mix moist, and keep the lid on the box for the first two or three weeks. After that time, gradually expose the plants to the environment outside the box by setting the lid on the box slightly cocked. Every few days, open it a little more until, about two months from deflasking, the box lid is removed completely. Most seedlings respond well to a light intensity of 500 to 800 foot candles, or light similar to a phalaenopsis or paph growing area. Small cymbidium or zygopetalum seedlings can be grown with Phals or Paphs easily.
Loren Batchman
August 4, 2000