

Revised: 10/23/2008
 |
 |
 |
Easy Benches Revised: 10/23/2008 |
We have settled on a simple, inexpensive bench design for use throughout our nursery where we place 6 inch or larger pots, or smaller pots in standard nursery flats. These benches are portable (one large strong person, better with two), and have 48 square feet of area each. They can be placed end to end if desired to make a longer bench. The materials required for one bench is as follows:
3 2"x4"x8' redwood boards.
8 1"x6"x6' redwood fence boards
6 8x8x16 cement blocks
32 6d hot dipped galvanized (HDG) nails (more if you bend them too badly)
We use roughsawn redwood fence rails, selected to be mostly heartwood and free of large knots, for the bench stringers. The bench slats are made from roughsawn redwood fence boards, mostly heartwood and free of large knots, which we rip saw in half lengthwise. The boards may be dog-eared if that is all that is available although I prefer a straight end on the boards. Home Depot probably hates to see me come in because I sort through all the fencing material and take just the best.
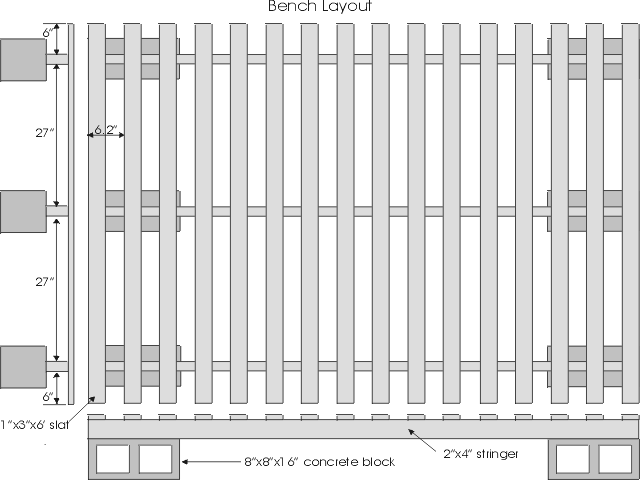
To build the benches, I use the following steps (see figure 1):
1. Rip saw the 8 1"x6"x8' fence boards in half to get 16 1"x3"x6' slats for the bench top.
2. Lay the three bench stringers out on a flat surface parallel to each other and spaced 27 inches apart. The ends should be even and the stringers should be setting on the edges.
3. On each of the outer stringers, starting from one end (the same end for both), make a mark every 6.2 inches. The last mark should be 3 inches from the other end of the stringer.
4. Lay a slat across the stringers, flush with the end used to measure from, and hanging over the two outer stringers by 6 inches. The center stringer should be right in the center of the slat.
5. Nail the slat to each stringer with one 6d HDG nail. Don't let the nail protrude above the surface of the slat. It will keep the plants from setting properly and may catch a flat or pot when moving plants. You can use more than one nail if you want, but one is sufficient.
6. Lay another slat across the opposite end of the stringers, again with 6 inches overhang on the outside and with the middle stringer in the center of the slat. Nail the stringer down.
7. Lay out the remaining slats even with the marks made in step 3. Each slat should be about 3 inches from the adjacent slats. Maintain the 6 inch overhang and nail each slat in place. This completes the bench.
To set the bench in place, lay the concrete blocks so that one will be under the end of each stringer. If benches are to be laid end to end, the blocks should be placed so that the end of each bench is well supported by the block.
These benches are easy to move around, if necessary, and can be stored on edge or stacked when not needed. If good heart redwood is used, the benches should last for many years. We have some that are 20 years old and still in good shape. The nails may rust away in time; to repair, just pound in a new one. Likewise, if a slat breaks or rots, just replace it. To make the wood last longer, the benches can be treated with a copper based preservative. Don't use penta (pentachlorophenol) based preservatives as it may harm the plants, particularly in hot weather or in a greenhouse.
If you want 3 foot wide benches, just saw the slats in half and use only two stringers. For 4 foot wide benches, you may want to get the slat material at a lumberyard to avoid a lot of cutoff ends from the fence boards. I find it just as easy to cut the extra material off the fence boards and use the scrap to mount staghorn ferns. 8 of these cutoff ends nailed together makes a two foot square, two inch thick mount for the stags.
Loren Batchman
October, 1998
